The – all about interactions – Guide
Dina
23 August 2018 - 5 min
One of the most valuable characteristics of the webinar is the possibility to really interact with the audience. Because it’s such an interactive medium, you can collect a lot of useful information about your viewers. To collect the right information about your audience, you can use different types of interactions during the LIVE webinar. The question is 'how' to use these interactions and 'which' possibilities do you have within the realm of interactions. We drew together all the points for you, let’s explore!
With WebinarGeek you have the possibility to use three types of interactions during your LIVE broadcast.
Call to action
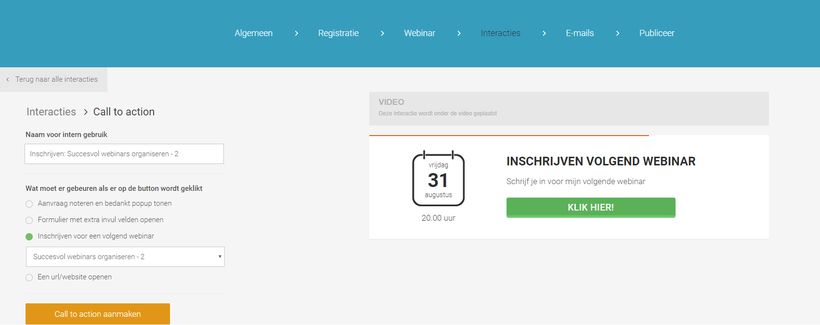
As the name says, a call to action motivates the viewer to perform a certain action. A call to action can offer the possibility to follow up on your webinar. But you can use call to action for a bunch of other purposes as well. With WebinarGeek you have the choice to create different types of calls to action during your LIVE webinar.
1. Pre-order requests: You can create a space in which the viewer can pre-order your product or service after the webinar.
2. More information: Would you like a bit more information about the viewer before they fill out their request, click on Open form with extra fields.
3. Register for a next webinar: You can also persuade the viewer to register for your next webinar after your live broadcast. Use your call to action to allow a viewer to immediately register for a future live event.
4. Open URL/website: By adding a URL you can link the viewer to e.g. your website by persuading them to click on the call to action.
Don’t forget to save your call to action after creation, by clicking on the yellow button that says Publish call to action.
Poll
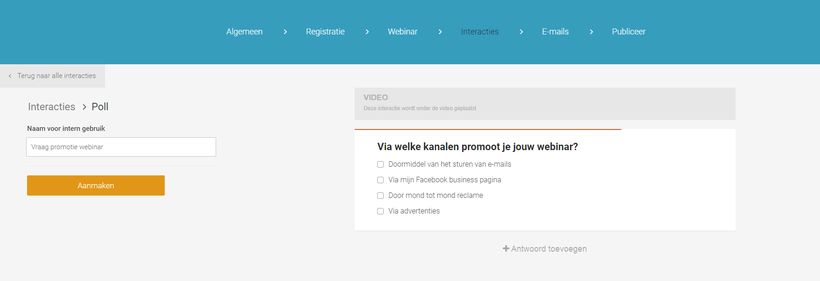
Are you burning with curiosity about the opinion of your viewers? Use a poll or statement! A statement is an assertion about a certain topic. You can ask your viewers what their viewpoints are, because a controversial statement will stir up some interaction! When you have a question for your viewers and would like their opinion on it, you can easily choose to create a poll.
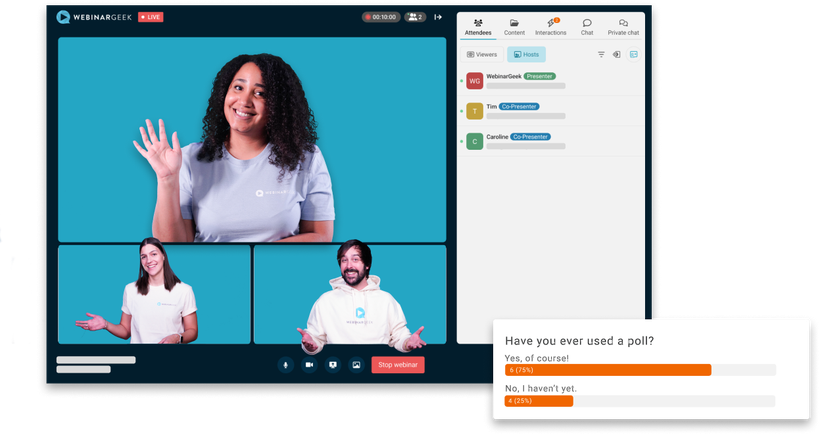
For example, ask what their preferred webinar frequency is, or which subject the next webinar should be about. The possibilities are literally endless. The fun thing about using a poll with WebinarGeek, is the fact that the results will be visible to your entire audience. By showing the results and discussing them, you can create even more interaction during the webinar!
Don’t forget to save your poll or statement after creation, by clicking ‘Publish’ when you’d like to confirm.
Information
Want to provide your audience with some background information about the webinar or like to raise a point of order? You have the option to create an information box in the platform itself. You can activate the information box at any given moment during the webinar. After having filled the information box, confirm it by clicking on the button ‘Publish information box’.
You now know how to create new interactions and for which purposes you can use them.
Use planned interactions during a live webinar
Before hosting the LIVE webinar, we recommend to first start a test webinar. In this test webinar you can mimic a real LIVE webinar, to see how it all works and if your settings are correct. So you can also use your pre-set interactions.
When you’re in the live environment, you can activate an interaction at any given moment. Do this by clicking on the ‘lightning’ icon. Next, under ‘which interactions would you like to display?’ open the options you set yourself. You choose which interaction to show, and if you’d want to show the interaction for a limited amount of time (or indefinitely).
Afterwards, you start the interaction and it will be visible to you and the viewer(s). The results will be visible to the entire audience. For the audience, the results will be displayed underneath the screen, and for the host they’re visible at the bottom and to the right of your screen. The interaction stops at the moment your pre-set duration has expired, or you can stop the interaction manually by clicking on the red square.
It’s possible to use multiple interactions at the same time. Only do this when the interactions reinforce each other. We recommend to separate the interactions to keep everything organized. Also, you have the option to use an interaction more than once during a webinar. In the statistics, the results will be separated for each individual interaction event.
Live chat
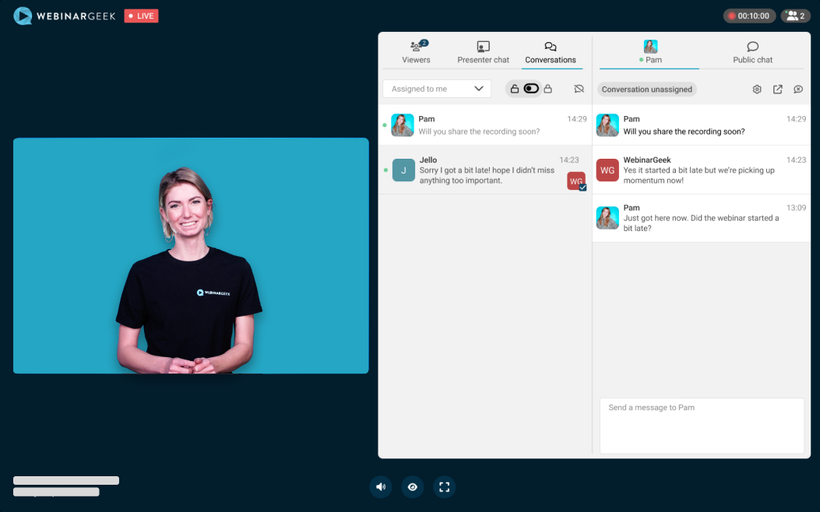
Another option to enhance interactions during the LIVE webinar, is using the live chat functionality. In the chat you’ve got two options to interact with the audience, which are private and public chat rooms. The terms already reveals the purpose of the types of chat rooms, you can start a 1-on-1 conversation in a private chat. If you have a message for the entire audience, send it in the public chat. Questions and answers will be visible to all in the public chat.
A live chat has multiple benefits. The chat is a ‘real time’ communication tool for your viewers. You offer them a chance to directly communicate without having to call or email you. Because you’re offering direct communication, you allow the viewer to be helped instantly, advise them, but also solve possible problems or questions adequately.
Chatting with the host they’re currently watching is also very personal. Further increase that sense of personal interaction by directly answering the questions being asked in the public chat during the live webinar. The most important aspect of a chat is offering viewers a chance to easily communicate without having a somewhat intimidating ‘barrier to entry’. Eventually, this will enhance the customer service experience of the people that will eventually purchase your products or services.
Beware, a live chat also has some negatives. When you’re not utilizing the chat correctly, it can cause problems. The main characteristic of a chat is being quick and easy. When you respond slowly, you give out the wrong signal. Or erger, when you don’t interact with your chat at all, irritations and negative responses will emerge. Also make sure you use the chat during moments where you can communicate clearly. So answer the questions that are being asked, don’t stir around the pot. But don’t be too direct either, the experience should be pleasant and using the chat should benefit your broadcast.
Statistics
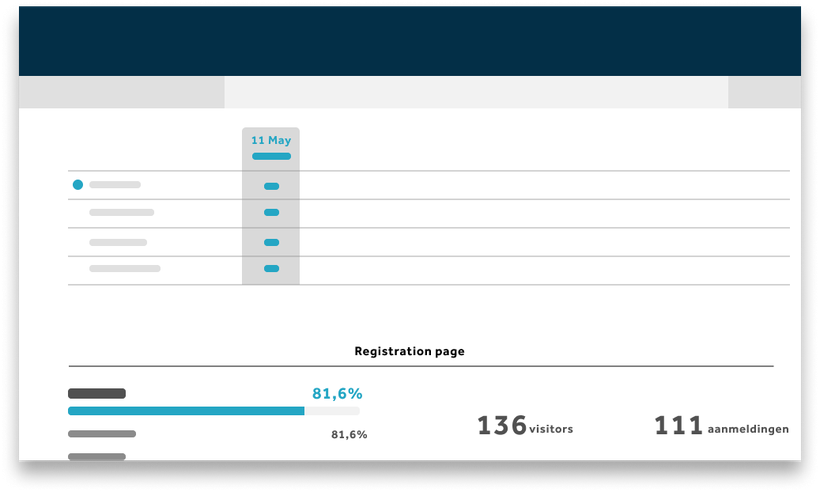
WebinarGeek makes sure all feedback on your statistics is gathered in one place. Go to your ‘overview page’ and click on the webinar you’d like to view the statistics for. Next, click on ‘statistics’ and on ‘interactions.’ You’ll see an overview of the response numbers to your interactions. To view a result overview of a specific interaction, click on ‘View results’ behind the interaction.
But what can you do with all that data? It’s very useful information you gathered about the people interested in your organization. Using this information, you can meet the needs and wishes of your target audience. That’s extremely valuable, because it enables you to position your product or service in the market in a way that targets the wishes and needs of those that will be interested in purchasing.
Sales page
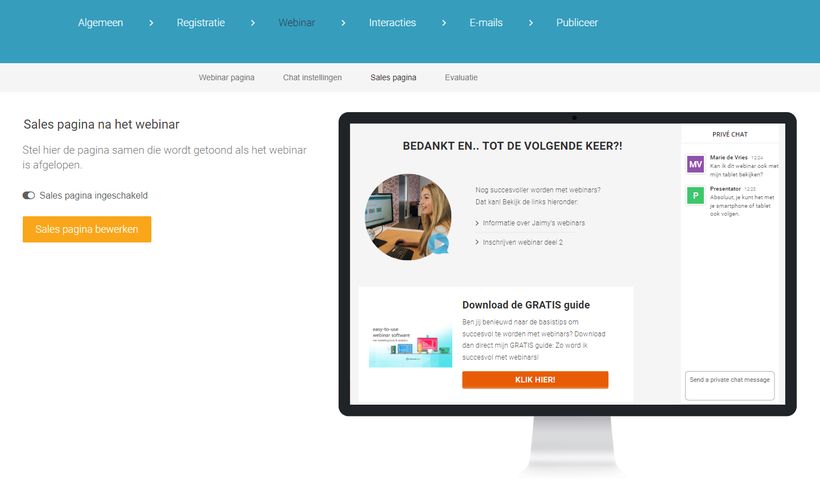
The sales page, this page is used to describe everything your audience could ever need to become interested in purchasing your product or service. It can help convince people to become an active buyer. On a sales page, you offer the potential customer the information they require. You’ll have to dive into the thoughts of your customer and answer their questions on the sales page. When you succeed in doing this, it’s the perfect follow-up to your webinar.
The benefit of using a sales page after the webinar is how fresh the story in people’s heads will be about your product or service. When you immediately offer them a sales page after a webinar, answering their burning questions, they will be inclined to take action faster. And obviously, that will mean a purchase of one of your products or services!
With the WebinarGeek platform, using a sales page is a walk in the park. During the editing of your webinar you can activate the sales page and the evaluation form yourself. The sales page can be used to remind your audience at the end of your webinar on e.g. an offer you’re currently running. The sales page will be displayed after the webinar automatically and will remain visible until the viewer closes the screen by themselves.
A good sales page does require some creativity from you. You’ll need to be able to speak to your audience’s needs. Below, you’ll find several practical tips for setting up a high-converting sales page:
Start off powerful - The first words are the most important ones. Make sure the first sentence is powerful and persuades the potential customer to keep reading! It’s important the first words are clear and are of interest to the reader immediately.
Clarify what the potential customer will receive - Explicitly name the benefits of your product or service, and even more important: explain what it will solve for your potential buyer. You can also show an example of a result to further strengthen your story.
Provide information - Make sure the public can prepare or can download something which they can use to read about your product or service.
Be transparent about costs - This is an important step, because to make a well-informed purchasing decision the costs are a key aspect. So always be transparent about the costs, so there will be no surprises or doubts about it later on in the purchasing process.
Use a call to action - This is the button that should persuade people to take action! Make sure it’s eye-catching and clearly distinguish it from your corporate identity. The message needs to be short and snappy as well: 'Click here to subscribe'!
Evaluation form
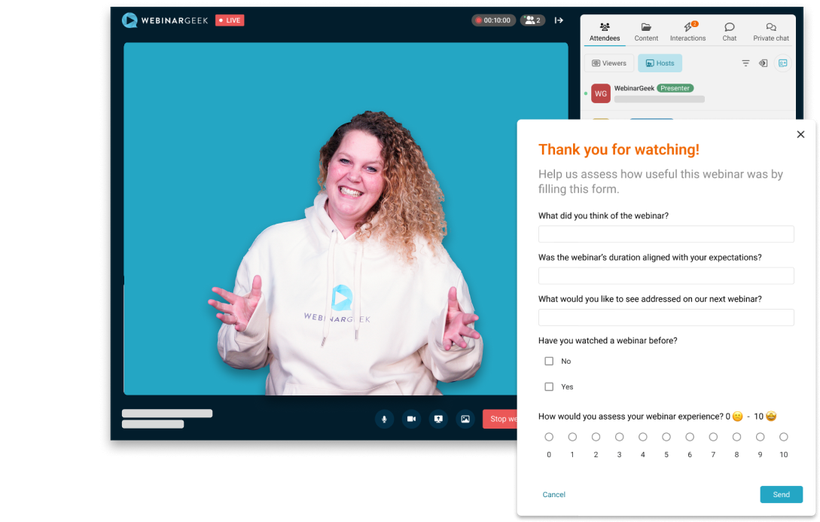
Another option is using an evaluation form. This will display as a pop-up on top of your sales page, asking people about what they thought of the webinar. This extra information can be used as feedback for the next webinar. The feedback on the evaluation form can be retrieved in your statistics under the header ‘Evaluations.’
The evaluation form is displayed directly after the webinar, which gives you a time-benefit regarding the memories and impressions of your audience about the webinar.
The main benefit of using an evaluation form is the ability to directly ask people for feedback on e.g. the live webinar. This feedback can be used to optimize future webinars.
Configure the evaluation form for all your webinars when you want to collect that powerful feedback from your audience, in order to learn something or improve future streaming events. But if you’d like to experiment and try something new during a future webinar, ask people if they’d be open to the change or not.
Good to know: both the sales page and the evaluation form can adopt the layout of your preference, e.g. your corporate identity. This makes things extra personal! But the most important thing to do is experience all this yourself. Try our webinar experience for the next 14 days, completely FREE!
Let’s webinar
Related articles
Webinar Ad Formats That Help You Reach the Right Audience
Discover 9 effective webinar ad formats to help you reach the right audience. Learn how to promote your webinar with clarity, value, and relevance.
How to Design a Webinar Registration Banner That Works on Any Device
Learn how to create a single banner image that automatically fits desktop, tablet, and mobile screens. A clear guide for better webinar registration pages.
How to Create a Webinar Registration Page That Actually Works
How do you create a successful registration page?
/f/110864/610x610/e007508fe7/dina_2.png)

/f/110864/1703x676/8f665f3826/screenshot-of-call-to-action-creation.jpg)
/f/110864/1787x612/e00fcbdfc4/screenshot-of-poll-creation.jpg)
/f/110864/1666x527/4130f8d0f3/screenshot-of-information-box-creation.jpg)

/f/110864/1247x662/cfcc35e6f6/group-1169.png)
/f/110864/1053x658/46e818cd2d/group-1164.png)
/f/110864/1037x622/c97c6b21bb/group-1126.png)
/f/110864/1441x875/14eeefcce2/screenshot-of-sales-page-creation.jpg)
/f/110864/1089x693/c51ac6d6d5/group-1175.png)
/f/110864/1200x630/51c422cb1e/webinar-ad-formats-that-help-you-reach-the-right-audience.jpg)

/f/110864/1200x630/a3487a6b34/how-to-design-a-webinar-registration-banner-that-works-on-any-device.jpg)

/f/110864/1200x630/22d2e7251b/create-a-successful-registration-page.jpg)
