Professional video camera as a webcam
Matthias
05 April 2019 - 5 min
Video and audio make or break your webinar. It’s absolutely worth your time to put some extra effort into these technical aspects of your webinar.
We designed our webinar software in a way that it's possible for everyone to organize and broadcast a webinar. You won’t need much to pull this off, only a simple laptop with a built-in webcam and microphone is sufficient. It’s plenty to be able to host your first live webinar! Easy and simple.
We obviously understand the need for investing in professional equipment to further improve your video and audio quality. We do support these options. It’s even possible to host a webinar from a professional studio if you’d want to!
It’s even possible to host your webinars from a professional studio.
There are several steps to consider. And it’s a good idea to wonder about what’s best for the eyes (and ears) of your webinar participants. It’s very easy to over-complicate things for yourself. The first option is to use USB equipment. These webcams and microphones are plug-and-play and will be instantly recognized by your browser. And you can directly start using them during your webinar.
The next step is to start using professional video cameras and microphones. By that, I mean HD video cameras or DSLR cameras. Technical knowledge about this type of equipment absolutely gives you a head-start. Let me help you get started.
WebinarGeek is browser-based webinar software
It’s important to realize our webinar software is fully browser-based. This means everything directly happens from your browser. A camera and microphone should be recognized by your browser as such. In this case, Chrome should be able to recognize devices as an audio or video source. A built-in webcam and camera will be automatically recognized. Most USB equipment will be as well.
For professional equipment, things are a bit different. You’d need a converter to make sure your browser can recognize them. For this, you can use a Blackmagic Web Presenter or the AJA U-TAP. These devices will generate the exact magic you’ll need!
With these little boxes, it’s possible to use virtually every camera as a webcam.
I’ll show you how to convert both devices from a professional camera into a webcam.
The Blackmagic Web Presenter
The first option is using the Blackmagic Web Presenter. This device can be used to connect your external equipment, using SDI or HDMI, in order to make sure your camera will be recognized as a USB webcam.
The Web Presenter has been created for streaming via the internet in modern browsers and works with “plug and play”. You connect the devices, plug the Web Presenter into your computer and you can start immediately.
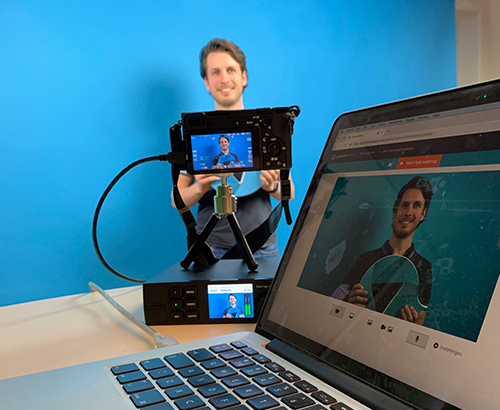
The Web Presenter can be connected with a mirrorless camera and a laptop.
The setup
This is how you can use a Sony A6300 mirrorless camera as a webcam;
Connect the Sony A6300 with a micro HDMI to HDMI cable on the Web Presenter.
Connect the Web Presenter with a USB cable to your laptop. This is a USB-A to USB-B cable. It won’t be included with the device. This type of cable is used a lot for printers.
Start up all your equipment and select the Blackmagic Web Presenter as your input, within the webinar room of our webinar software.
The use of the optional smart panel of the Web Presenter.
With the smart panel you’ll see an example of your input together with an audio indicator. When connecting two cameras (one using SDI and another using HDMI), you can switch between the cameras with buttons 1 and 2. This the method when working with separate cameras.
About the Blackmagic Web Presenter
Compatible: Mac, Windows, Linux, or Chromebooks.
Connections: SDI and HDMI in, USB out.
Price: EUR 435 (optional smart panel for switching between camera screens excluded, valued at EUR 79).
Find more information over here.
Benefits
Easy to use, little technical knowledge required
Work with almost all external equipment.
One device, no software required
Can be used as a camera switcher
Good support
Drawbacks
Expensive
When you’ve got two cameras, one needs to be connected using SDI and another using HDMI
De AJA U-TAP
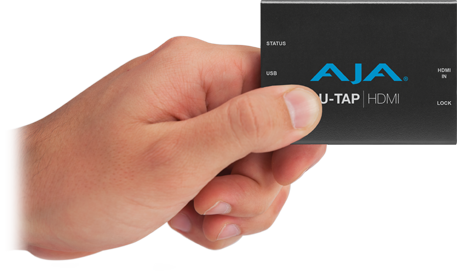
The U-TAP is a compact device (smaller than your smartphone) and converts every HDMI signal to USB 3.0. The U-TAP will convert your favorite video camera into a webcam. The nice thing about the U-TAP is that it doesn’t require any software or drivers.
De U-TAP is beschikbaar in twee varianten, de HDMI variant en de SDI variant, afhankelijk van welk signaal je externe camera gebruikt.
Set up
With these steps you can use a Canon DSLR as a webcam:
Plug the HDMI end into your AJA U-TAP
Plug the HDMI end into your AJA U-TAP
Plug the U-TAP in the USB port of your computer
Select U-TAP as the audio and video device when selecting your webcam
That's it!
The U-TAP is very compact, making it very practical for mobile webinar studios.
About the AJA U-TAP
Compatible: Mac, Windows, or Linux
Connections: SDI ór HDMI in, USB out
Price: between 250 and 300 euros
Find more information about SDI and HDMI.
Benefits
Ease of use
Little technical knowledge required
Works with almost all external equipment
A single device, no software required
Compact en portable
Drawbacks
Works with either SDI or HDMI, two different devices
The Elgato Cam Link
The Elgato Cam Link is a small device for your USB port with an HDMI out port, and it’s just as compact and functional as e.g. the U-TAP. However, the Elgato Cam Link only works with HDMI, whereas the U-TAP also requires e.g. SDI support. The Elgato Cam Link is a lot cheaper than the U-TAP and in many instances a great alternative.
The Elgato Cam Link hasn’t been tested by us personally but is successfully used by a lot of our users.
About the Elgato Cam Link
Compatible: Mac, Windows, or Linux
Connections: HDMI in, USB out
Price: about 130 euros
Find more information here.
General tips and settings
Ready to get started yourself! And use your desired setup during a real webinar. Finally, we’d like to give you some general tips that can help you build a stable and good-working solution:
Testing, testing, and more testing. We can’t emphasize it enough. Especially when you’re about to use different software or hardware to connect external cameras and/or microphones during your WebinarGeek webinar.
Test with real viewers.
Create a test recording.
Make sure you schedule enough time to test all your equipment thoroughly.
Not only test video or audio but also test them together: For example, test if everything is in sync.
The optimal frame rate is 29,97 FPS.
The optimal resolution is 1280x720 px.
If you encounter a problem, rule out certain aspects that could go wrong. For example, test it using another computer or internet connection.
Google is your best friend whenever you encounter technical problems or have questions about specific hardware in combination with your computer. Some producers, such as Blackmagic also have phone support. There are also different communities and forums where you can ask any technical streaming question.
Good luck!
Related articles
A Whiteboard in your Webinar? This is how!
Whiteboards are ideal for writing down ideas and visualizing information. Learn how to create a whiteboard in WebinarGeek.
Preventing and managing technical issues during your online event
Hosting online events can be exciting, but let’s face it: technical issues can sneak up on you, and that’s the last thing you want. So how can you prevent and manage those issues? In this blog, we’ll walk you through how to stay calm, focused, and professional while delivering a seamless experience for your audience.
The Product Demo Video - The Virtual Tour of Your Product
Convince your prospect with a product demo video to go further down the funnel.
/f/110864/616x610/ec74ed1981/matt_2.png)

/f/110864/870x400/f22f189789/professional-video-camera-as-webcamat2x.jpg)

/f/110864/500x410/2052dec730/blackmagic-webinarsetup.png)

/f/110864/500x667/91b0de853d/blackmagic-webinarsetup.png)

/f/110864/462x271/4b381f0ac1/utap.png)

/f/110864/2400x1260/e8236b0c0f/og-image-of-a-whiteboard-in-your-webinar.jpg)

/f/110864/1200x630/d26f6fd959/preventing-technical-issues.png)

/f/110864/883x614/83b9d4ede0/browserbased02.png)
